Links
Tags
Building a Synchronised Christmas Lights to Music Display - Part 5
And... it's done!
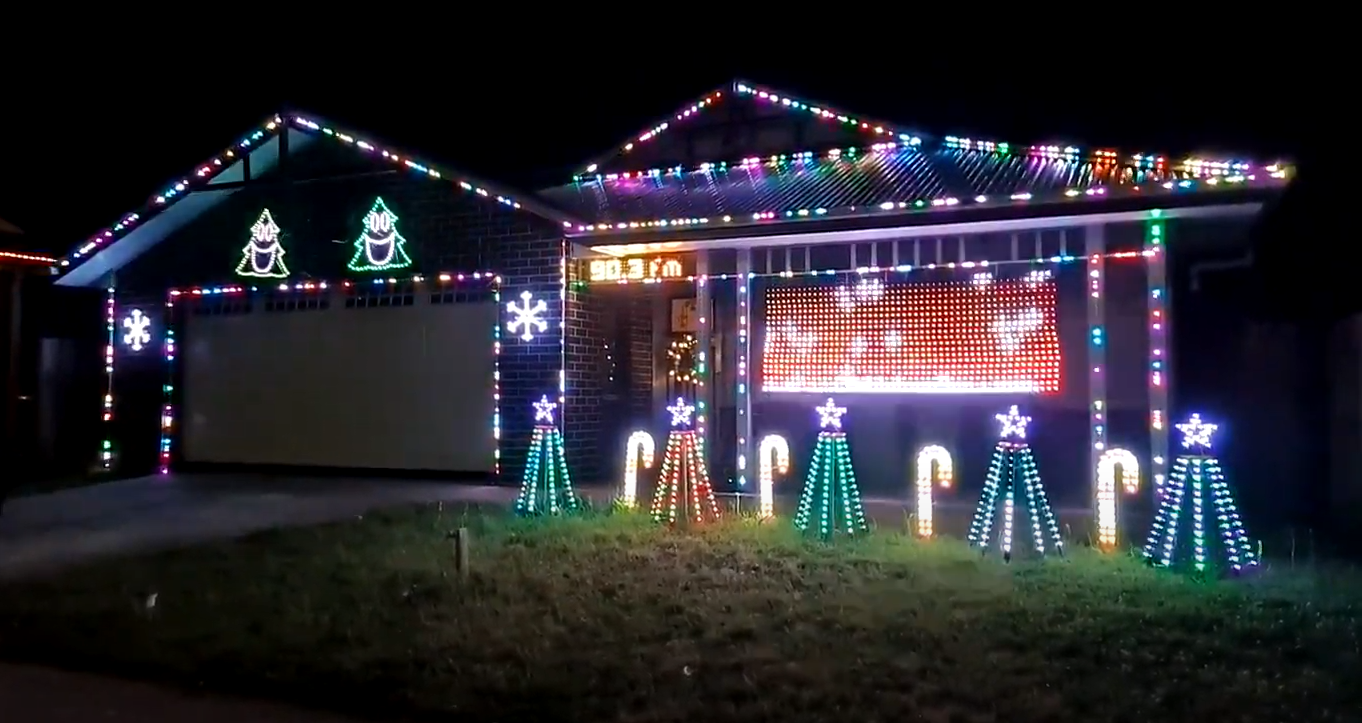
What a long month it's been too! A couple of weekends were unfortunately occupied by circumstances beyond our control, but it is all up and running ready for tomorrow night's first genuine 8:00pm to 10:00pm show. So how did I get here?
PVC Matrix
I'm just going to come out with it. If you're thinking about building a large frame, just don't. Save yourself the trouble and go the Coro or Netting route. While it has come out OK and quite usable, it's been a large waste of money (Conduit, Paint, Wires) and time (significant amounts of it too). I've previously mentioned the plan and suffice to say, I managed to break several drill guides and still made wonky holes. Despite all of that, the end result is great if not a little wonky. So PVC Matrices - just don't. I can't recommend them.
Mounting LED Strips for the Roof Outline
Yes - I know everyone says don't do LED strips, but I've found them largely easy to work with, with some caveats. When I started planning these, I figured I'd be mounting them to PVC and using Magnets and Clips to hold them in place. Instead, I managed to get a hold of some 16mm cable conduit with some lids that were perfect for placing LED strips in. This allowed them to remain straight, waterproof from the provided silicon sleeves and in lengths that were reasonably easy to install.
I then designed some 3D printed mounts that I could install magnets readily available from Bunnings in and hold those in place. The effect is great, it's pretty much mostly straight and they'll be relatively easy to store (they're all in 2m sections and will slot up into storage - unfortunately this was all I could get delivered without spending $40.00 for Bunnings to do it in the middle of a lockdown).
Mounting LED Strips for Front of House
I did end up opting for PVC conduit for the front of house as cable tying was possible here. Not much to say except that it was cut to length and cable tied on. The right hand side doesn't even use Conduit - the house had pillars available to tie these to.
Mounting Props above the Garage
Let's just say that using a 18V Hammer Drill just won't get through brick. You'll get through the mortar, but I wanted some solid mounts for these props and in future, we'll hang some plants or lights or something up there anyway. I wouldn't drill in anything used for 1 month of the year otherwise.
So... I went out and bought myself a rotary hammer drill and the holes were in within seconds. Just like butter. If you can borrow one, I'd recommend doing that instead. With some house reno projects for next year though, it'll make a good jackhammer for getting tiles up. :)
Lessons learned.
This has been one fantastic lockdown project to do. For sure there are monotonous tasks that have you question what you're doing all of this for that just need to be done. But the end goal was always to make a display that my son and other kids in the street will enjoy. Suffice to say, within about 30 minutes of the testing - there are many happy viewers which makes it all worth it at the end of the day. There are definitely many lessons learned - some of which I had read about and watched others talk about that helped prepare for some of it, but in no particular order I've listed them below.
- Understand that this is an expensive hobby. I have just over 3,000 'pixels' in this display - 1,600 for outlines, 1,000 in the matrix and around 600 for Lawn Props. The pixels themselves cost around $0.40 each so around $640 for the bullets and the outline being strips came on 5m reels for around $25 each landed from China - this cost around $400 (I was able to add in power injectors and other things in the order to help offset the shipping cost). As for the rest of it, I already owned a 3D Printer, Soldering Station, many Raspberry Pi's and pretty much all of the tools minus that rotary hammer drill before commencing the project. There are also all the cables, consumables, ABS filament for the printer if you choose to go that route, solder, paid for sequences if you don't want to do them yourself, and purpose built controller boards that all add to the cost. I've lost count on my particular consumables there but it could be as high as $600. My point is that even though I've come out of it relatively cheaply, if you're buying ready-made controller and power kits, controller boards, 'props' from the vendors, pre-made sequences among other things, then these are going to cost you extra - in the realms of double - or more.
- Time is more important than cost. If it wasn't for Work from Home directives, I wouldn't be able to utilise my lunch breaks to swap over filament and start the next 3D print jobs. That would have easily tripled the month I spent printing all the parts that I would need. This hobby takes time. Try to find stuff that will save you time (such as pre-made props where it makes sense to, pixel strings to the correct length, learn how to solder, etc...). If I had to put hours in, there were many bulb pushing moments, proof of concepts etc... where I was juggling multiple things at once. I can't imagine having less time to put the display, and I started way back in July! Then there's the sequencing...
- Part of the fun of running your own light show is that you get to control it. This does require some creativity either in artistic work or musical talent. I'm certainly not the former but I do muck about with music which made the leap into xLights pretty easy for me. I have however taken heavy inspiration on various displays and the sorts of songs that are run. I've also taken advice from other videos on how to make them. I can see a healthy progression where I've relied less on what I've seen and more on my own creativity and I must admit it's fun - albeit super time consuming to do. I think I'm spending around 4-5 hours on sequencing. At least this one I can do on my laptop while watching kiddo. Don't underestimate the time though - and this includes if you're going to purchase sequences. You still need to align other sequences to your own props and they don't always fit. And perhaps worse, the 'freebie' stuff on the xLights drive while absolutely fantastic that it's even offered, are usually purpose built. I know this from doing my own - I can't really publish them, because they nearly all require unique things per tree and candy cane. Paid for sequences recognise this and are usually more adaptable to displays that are 'grouped' a particular way than individual prop addressing.
- Neighbours and viewers will love whatever it is that you put up, and some will always find something to be critical about. It's not a bad thing but if you want to cover all your lights in twinklies, play with shaders or just flash up random colours - people will be impressed anyway. Even with all the cable ties still in place, I think people just really like to see lights and especially if they haven't seen anything like it before, they're going to be marvelled by whatever it is you put up.
- There's a time to 3D print and a time not to. My display is almost all exclusively 3D printed. When it's not, it's using PVC conduit to hold things in place. A good example of where printing worked for me is in the singing props - they are purpose built to sit above the garage at a particular dimension. I'd certainly go out of my way to print again albeit I might try and personalise the trees a bit more (I'm stealing that idea from Tom BetGeorge's fantastic display - love the banter and characteristics of each 'actor'). On the other hand, the 3D Printed Trees kind of work but not only would it have been cheaper to buy the Coro props (which I inadvertently discovered an Australian supplier of them), they'd have been more solid.
- Your display doesn't always need a Mega Tree. I know I might eat my words on this when I might get around to actually putting one up when I have a bigger frontage, but I think the display I have this year is good without one. Props to those who can do it, but the safety implications if it falls down (and we get some pretty strong winds here in South East Victoria), and time to set up do concern me a little bit.
- Controllers and Power Distribution - things aren't always going to work. I've got some flashing in the display which seems to be related to two of my Raspberry Pi's having dodgy GPIO pins for PWM. I haven't quite worked out how to solve it, but one is significantly worse than the other. The Raspberry Pi Zero's are more than capable of powering some lights, so I think next year I'll be making smaller and more portable boxes so that they can be closer to their props. I'd like to get a proper controller at some point as well, but the RPi-28D+'s are very convenient to purchase as you need them, and frankly the price difference is comparable to the differential receivers that other purpose built boards are for. But - if you're starting out, then look at the Falcon boards, Kulp controllers and HE-123's if you're happy with a Beaglebone solution.
- I mentioned earlier about buying pixels in strands with the connectors already on them. The reason I say that is it takes a considerable amount of time to splice and solder on new connectors. I found the quickest way to do this is to solder and heat shrink. I had been using some heat-shrink solder sleeves but they take much longer than just soldering and heat shrinking yourself (and it requires in my experience your alligator clips perfectly aligned to hold the wires in place). The less of that you have to do every odd-number of pixels will both reduce waste (the few pixels left that you can use to replace faulty bulbs down the track - but how many do you really need?). When designing your props, keep this in mind too. I didn't do this with the Christmas trees, so I have 156 pixels (I had to cut off 6) and 202 pixels for Santa (cut off 2). What I should have done is increase the outline density on the trees and created more mouth movements for the trees, and either increase the density on the outline for Santa or find two pixels to remove. This would have created a good situation where no splicing would be required. For the Snow Flakes at 48 pixels, what I should have done there is leave the last two connected but set them to 'blank' and just leave them hanging. All of these things would have reduced many hours spent on trying to make the perfect strings and waterproofing them.
- You can buy stuff cheaply from China, but remember you're buying them cheap. That does mean that the connectors you get might be slightly off, some pixels will be dead on arrival, and some of the stuff won't quite fit together. I'm OK with mixing voltages and connectors in the display - I know where everything is going and have labelled them as such. But... yeah - just remember you're going to be buying cheap, so don't expect the best of quality.
- This stuff cannot be bought as a 'kit'. There are a few companies coming out with some things to mimic music synchronisation such as Mirabella at Kmart with their 50 lights on a string, they even use the same WS2811 bulbs - but they're also twice the price of a string of bulbs and aren't interfaceable on a PC to create the sort of display you can with xLights. Synchronisation to music also isn't just about flashing lights to a beat. Yes, that's part of it - but the best sequences have some sort of flow to them. Computer generated sequences to me, they just aren't that appealing as a display. Mood lighting yes, but not as something to watch. Also if you're trying to light up 3,000 of those, that's 60 power packs you've got to power it all. Yeah... that's just not going to happen. There's a time and a place for off-the-shelf kind of stuff and possibly even a good middle ground for some flare in your traditional outdoor displays, but it's not going to be ... well, one of these.
Finally, you need to really really want to do a display synchronised to music. I mentioned right at the start my reasons for doing this and the inspiration. For the same amount of money, you'd be able to cover your house with inflatables and normal fairy lights - and probably come out with some substantial change. You really can create some really awesome displays and these days even do it with Solar. I'm also looking forward to browsing these more traditional kind of displays as the artistic license used in those can be very calming and pleasing. Whatever you do to celebrate whatever it is you do at the end of the year with lights, this area is one area you really want to do and be prepared for the time and money that goes into doing it. If it scares you, then look up some of those around you and watch someone else's work. There are some really remarkable displays. The best place outside of Tom BetGeorge's one in the USA, check out AusChristmasLighting displays to see if there's one nearby.
In the coming days, I'll film a video of the 2021 show for your viewing pleasure.
Building a Synchronised Christmas Lights to Music Display - Part 4
With only seven weeks to go, the pressure is on to get all the gear on the house in the next two to three weeks. The same "90% of the work takes 90% of the time, 10% takes the other 90% of time" statement often given to IT projects rings true here too. There has definitely been a lot of work done, but mostly in the non-visible areas of the setup.
The Singing Faces
One would expect that the star of the show will be the singing faces. After all, seeing the singing faces is what got me into really wanting to do this in the first place. Suffice to say, I finally got enough cabling in to start testing what multiple props together looks like and the result is great.
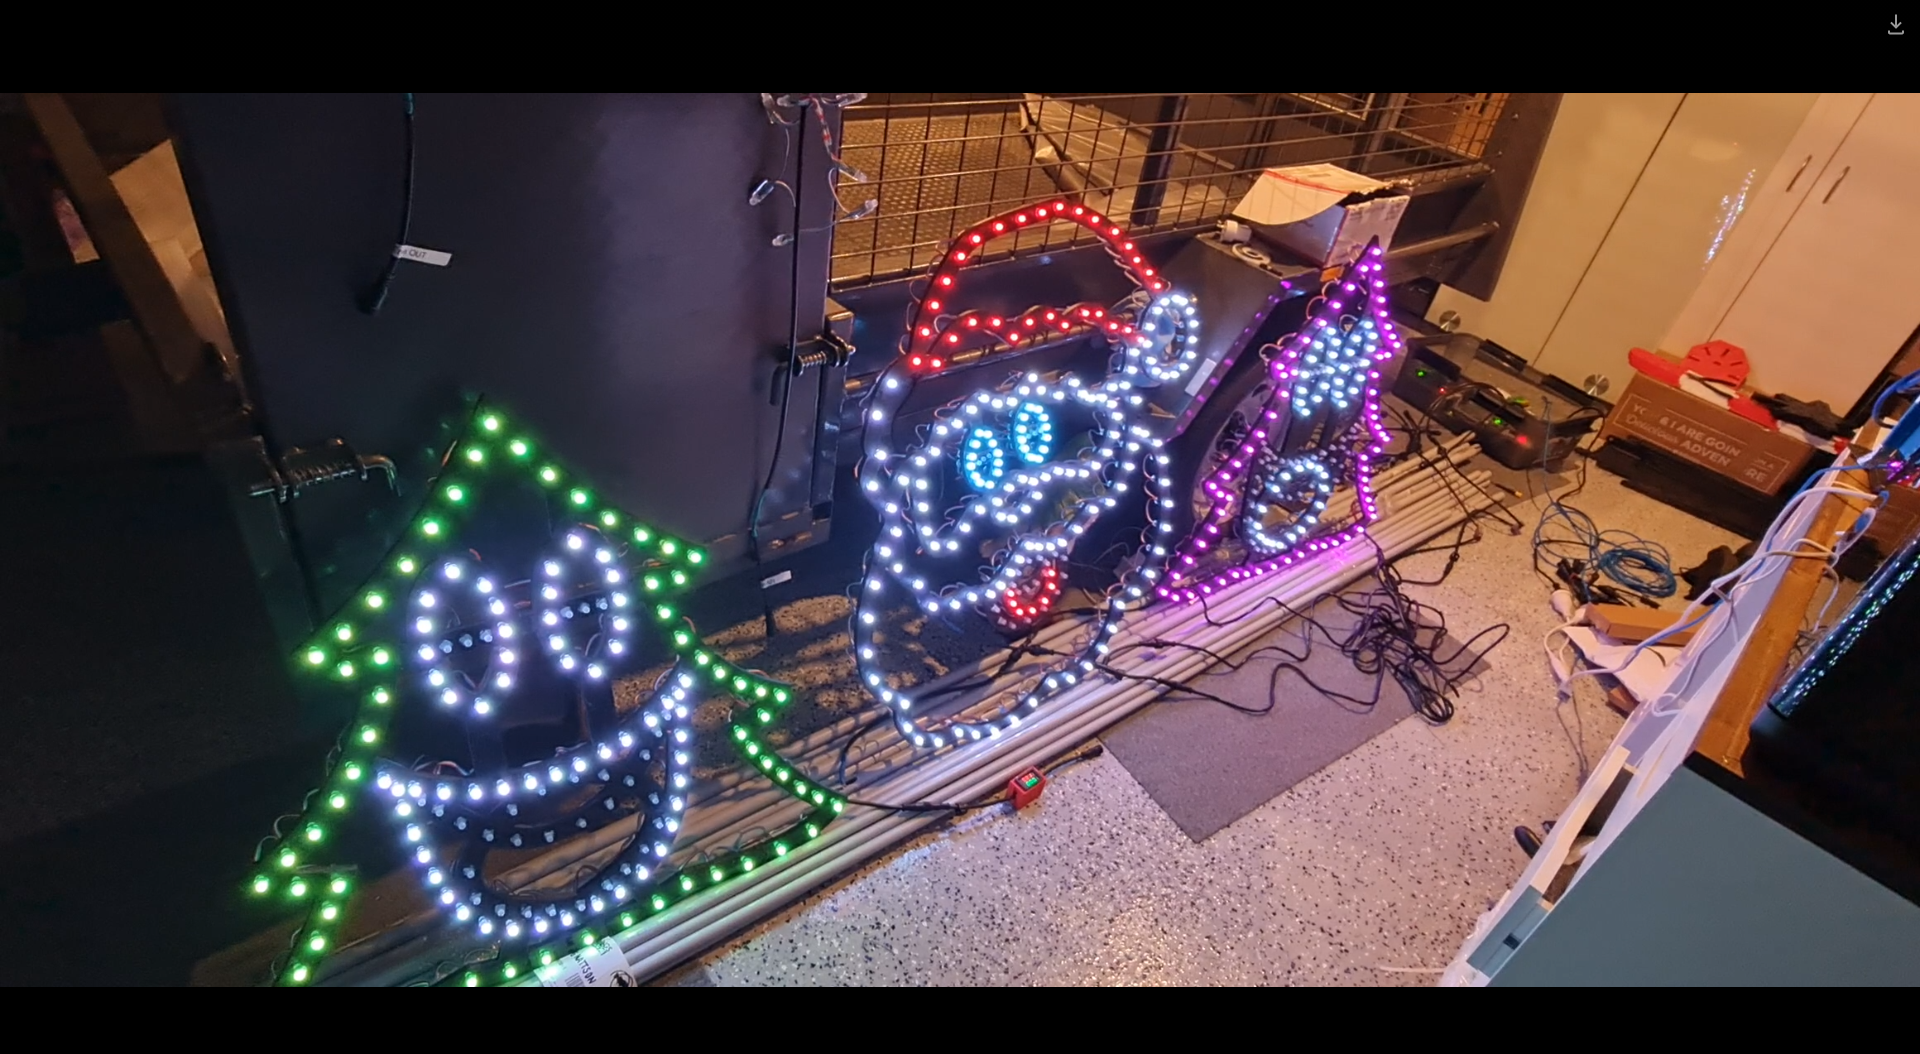
This was certainly something special to see - the props that I'd been working hard on are finally doing exactly what I asked them to do. It's the same sort of satisfaction one gets out of writing code that "just works" - but this felt different. Perhaps the last time I felt this level of accomplishment might stem all the way back to 2016 during the Tour de France live racing project I was part of. Unfortunately it was also short lived when a second sequence I launched caused some significant flickering and colour changes that I thought I knew the answer to.
Now the problem when you watch several hundred YouTube videos on the trials and tribulations of lighting displays, you might be forgiven to thinking you know the answer to any number of problems you may experience. The obvious answer to me was power injection - but I had a T Junction between each of these props, so that shouldn't have been a problem (you can see in the image above the little red volt ammeter box I made in the previous post). While there was an expected voltage drop, the power injection should have absolutely compensated for it. In fact, I even set the brightness from 30% up to 60% expecting a number of pixels to go red (first one to light in a chain) but nope - the flickering didn't seem any worse or better.
The next thing I tried was to swap over the power injection wires in case I had butchered something in the wiring process. I have a collection of 2 pin and 3 pin cables - so swapping these out might also help. Nada. Changed ports on the Power Distribution modules in the power boxes - still the flashing exists. It was getting late so I gave up for the night only to revisit thinking that maybe it requires a signal boost. I'm still not sure why I thought that'd be necessary - after all, each "pixel" should 'regenerate' the ws2811 signal relative to ground so perhaps that was it - but again, power injection should fix that. Several other fixes later, and I tried to work out why one sequence worked and all of the others didn't. Honestly I should have spent more time on this aspect than the others. After watching a few more videos about how the WS2811 signal works (keeping in mind I don't have an oscilloscope), it would appear that if I simply changed the number of output pixels, the flashing would go away (albeit the left hand tree wouldn't light up at all).
Years of problem solving suggests go back to basics and find the odd thing out. The main difference here is that one sequence worked and the other didn't. When I disconnected the left tree, the middle Santa still flickered on that particular sequence so maybe there's something to do with the controller or that sequence. Now, I've been sequencing at 40fps "just because" and never gave it much thought as to how the data would get to the pixel to light up correctly. The 40fps means there's 25ms to process all the data required to light up some 800 pixel x 3 LEDs per pixel. That leaves around 0.0104ms or about 10 microseconds per frame (or 30 microseconds per pixel). So... if you have 800 pixels, and your controller can't quite push 30 microseconds per pixel, you're going to get some corrupted data. In this case, that corrupted data might very well be within lights towards the end of your 'string'. So armed with this thought, I changed the port to rule out a dodgy PWM pin, and sure enough - at 40fps, all three props lit up perfectly and all in sync. To rule out the controller board, I also tested another Raspberry Pi and sure enough - that worked fine on both ports. So yay - on one hand I resolved the issue and on another - I've got a Raspberry Pi 4 that can only push around 400 pixels at 40fps due to something not quite right on this one PWM pin.
Power Distribution
I touched on power distribution last time, but suffice to say I now have two power distribution boxes set up - one for the roof to control the LEDs on the upper half, and one for the ground to do the LED strips, light up props and matrix.
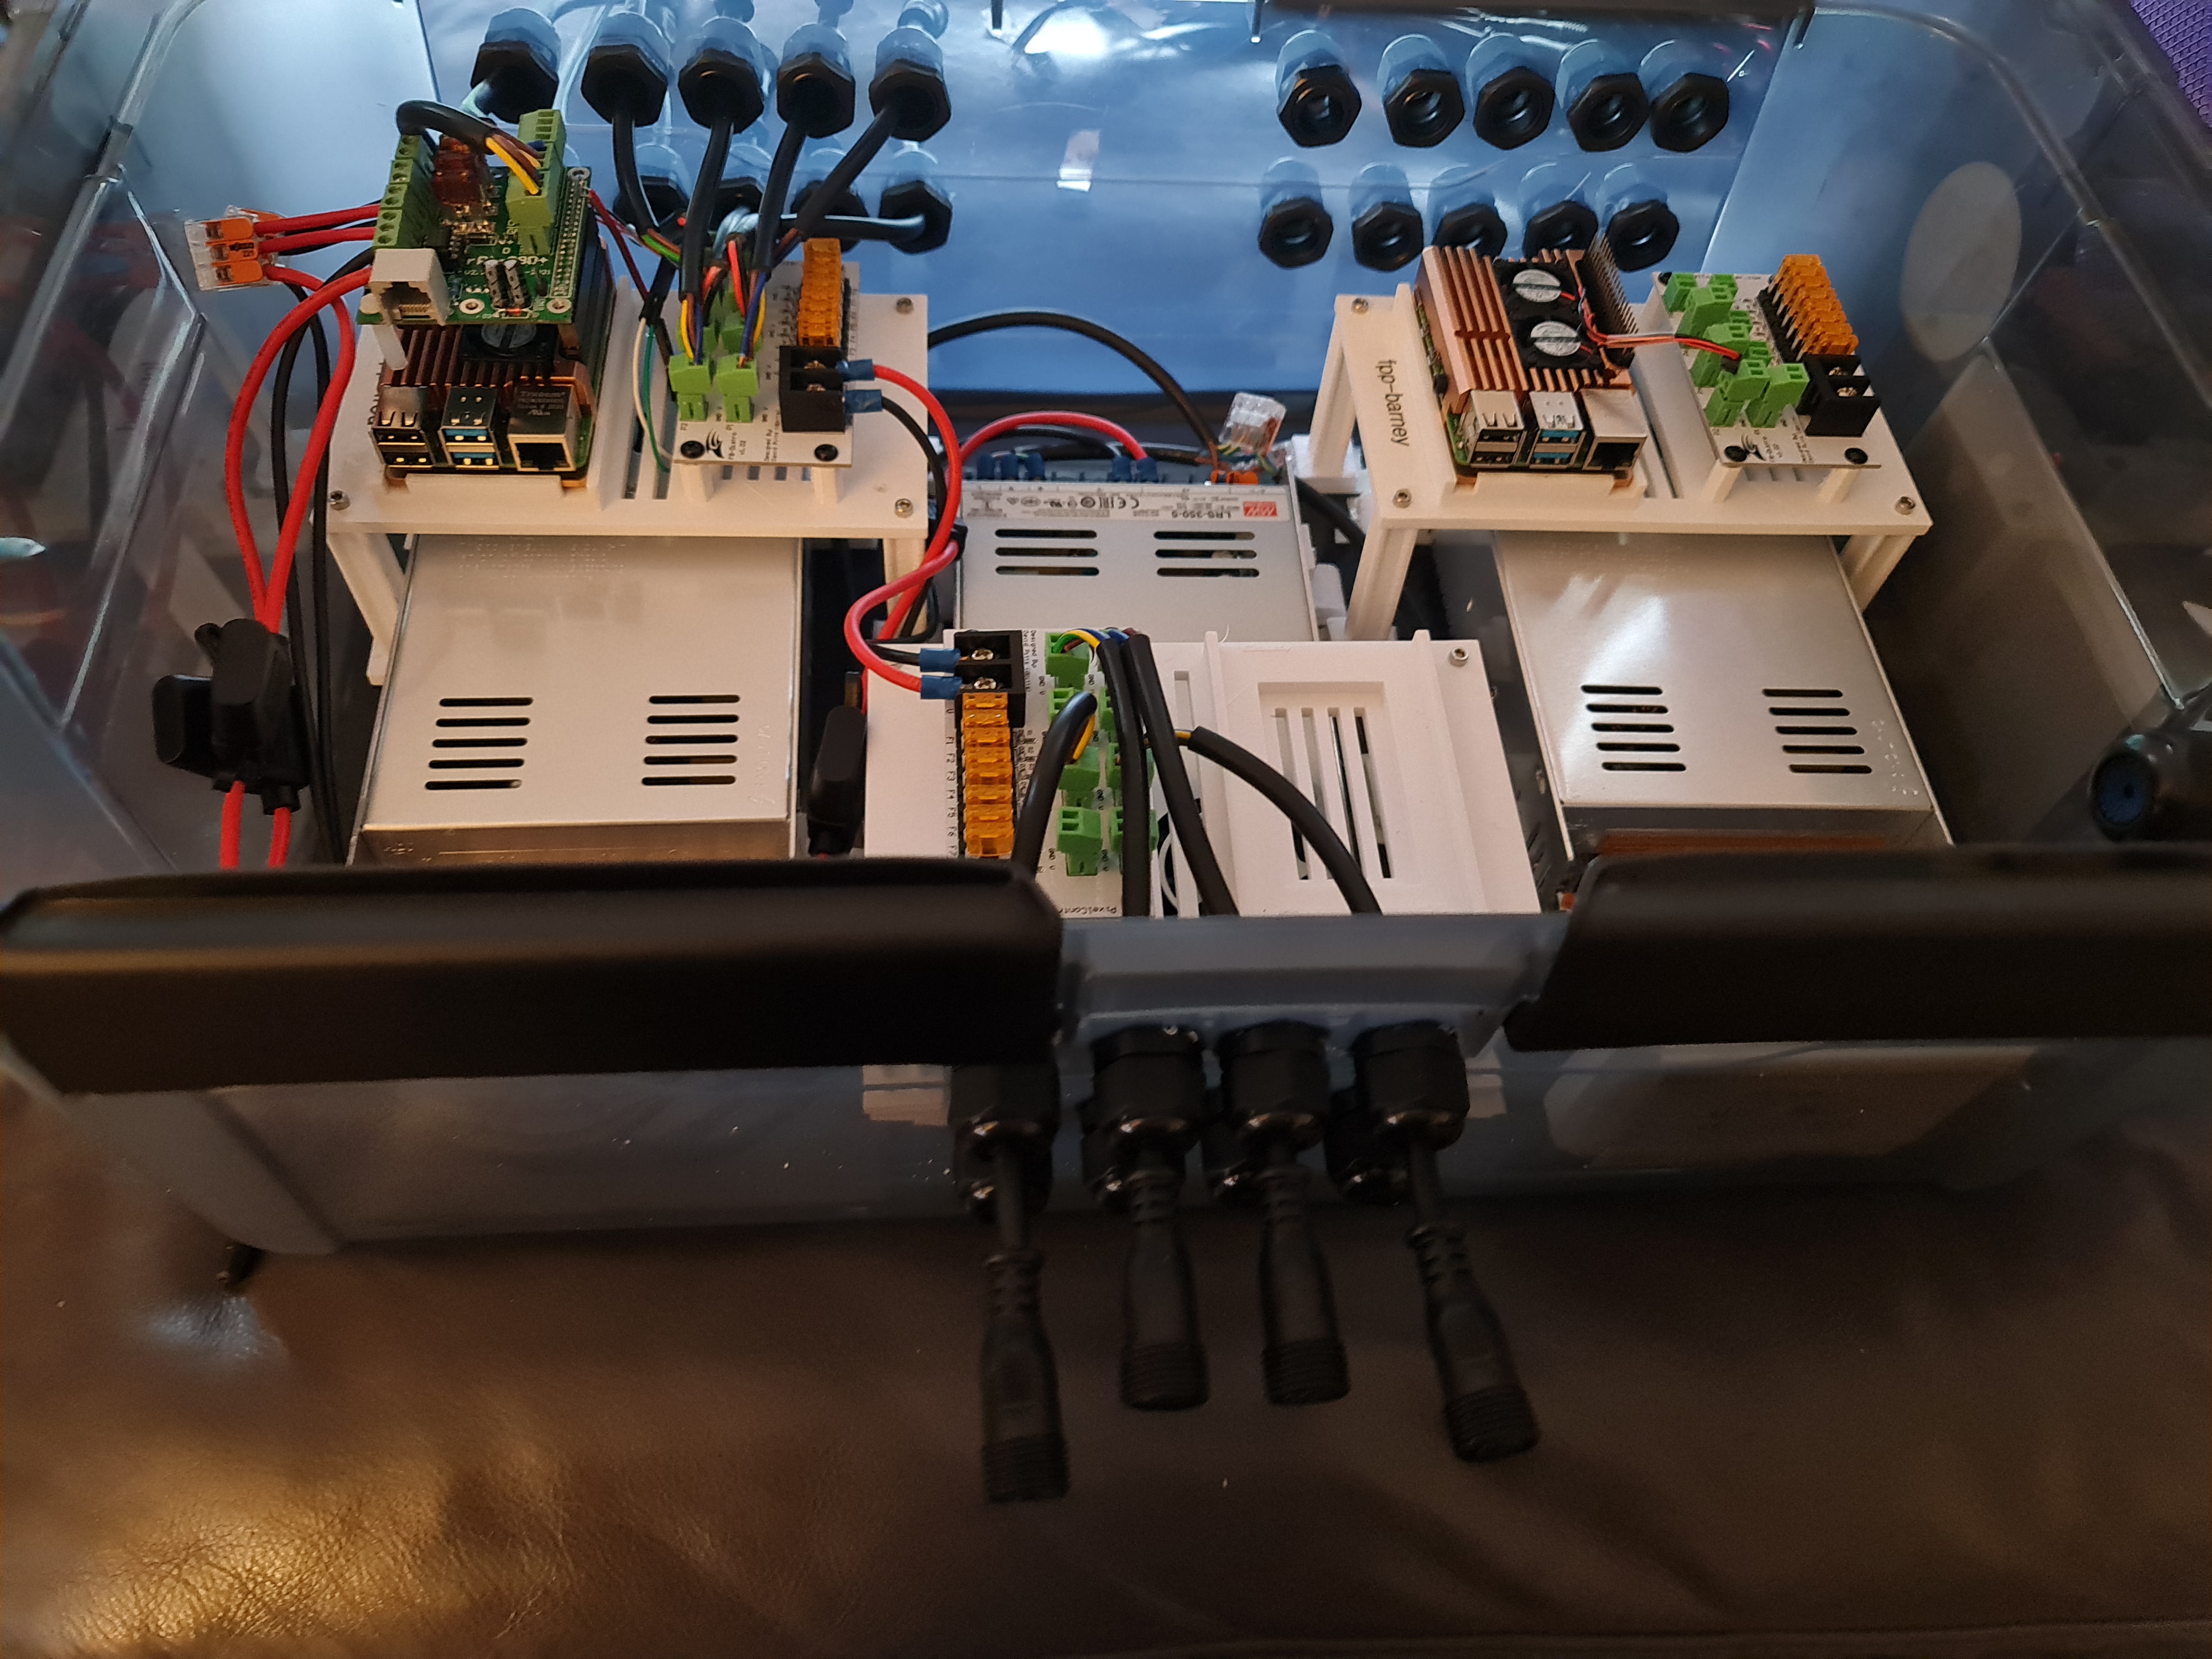
I won't spend a lot of time posting about it - there are plenty of nicer boxes on YouTube and Facebook for this sort of thing but the basics of this setup include:-
- Raspberry Pi 4 with RPi-28D+ capes to run 800 pixels per port (see that flickering post above).
- An 8 port Power Distribution Board
- Either 12V or 5V Power Supply depending on which side of this box I'm plugging stuff into.
In addition, there's a Cat6 socket that plugs into a Ubiquiti Flex Mini switch that's USB-C and POE Powered (yay! found a use for another draw hog) - so these will work nicely under the roof line. To help with some electrical safety here, each input and output is 'fused' to their correct rating - the idea being if we get a short, we'll reduce the risk of something burning.
That's probably all I'll say about this - I wouldn't want you taking electrical advice from a software developer.
Building the PVC Matrix
Ok - so here's an interesting one born out of some ideas borrowed from this video. This is going to be a 50 x 20 pixel matrix cut into 2.5m sections and 5cm spacing. I mocked up several 3D Printed designs - which frankly have been useful but a total waste of time (even when printed at 100% infill, the ABS just isn't quite strong enough to hold the PVC Pipe in place. I also didn't have a drill press, so having 3D printed drill guides helped create some kind of straightness although far from perfect. After several hours dedicated to drilling holes into PVC, the rest is down to painting.
The video I mentioned earlier makes this look easy - frankly this is perhaps the most annoying of all the props to assemble. After painting, I've managed to scratch the paintwork pretty extensively using my 'rings' that will hold and space the PVC pipes together. It's also been super time consuming. Doing this again, I'd probably opt to look at some of the commercial offerings - whether that's chicken wire with 5cm spacing and 3D print 1,000 mounting circles or something else.
Anyway - pictures on this one to come.